Clinical Review Statement
This guide to interpreting before and after All-on-4® results was reviewed by Dr. Hadi Yusuf , Phd in periodontology, Istanbul Medipol University . This content adheres to clinical standards for outcome documentation.
Last Reviewed: March 15, 2026
Next Scheduled Review: March 15, 2027
Table of Contents
ToggleQuick Definition & Core Principle
Before and after all on 4 dental implants comparisons document the functional, aesthetic, and structural rehabilitation of a full arch using four strategically placed dental implants.
Critical Insight: While many clinics advertise all on 4 dental implants before and after smile in a day, the true, stable outcome evolves over 12–18 months. Correct interpretation requires understanding this timeline.
How to Read ANY All-on-4 Before/After in 60 Seconds
Check the Clock: Is the “After” photo 12+ months post-op? If you only see all on four dental implants photos from the surgery day, you are looking at a temporary, not the final result.
Demand Three Angles: Legitimate all-on-4 dental implants pictures show the Frontal Smile, Side Profile (for lip support), and Occlusal View (the roof of the mouth).
Look Beyond Teeth: Focus on lip fullness and facial profile—this proves structural restoration, a key part of all on 4 dental implants before & after smile transformations.
Seek the Story: A credible gallery shows full mouth dental implants before and after: all on 4 cases that include the patient’s starting condition, such as bone loss or gum disease before and after all on 4 dental implants.
Not sure how your own case would compare?
🔍 Get a Professional Case Review
Reviewed by an implant specialist • No commitment • Clinical opinion only
How Before and After All on 4 Dental Implants Results Are Clinically Evaluated
Clinically valid outcomes are assessed through a multi-faceted protocol, not cosmetic appeal alone. Specialists evaluate using time-stamped documentation, functional benchmarks, and biological stability.
What Qualifies as a Legitimate “After” Result?
Minimum 12 months post-final prosthesis delivery
Final, definitive prosthesis (not a temporary)
Stable, adapted soft tissue (gums)
Radiographically confirmed implant osseointegration (bone fusion)
The Clinical Evaluator’s Checklist
When a prosthodontist reviews an “after” photo, they assess these five key elements:
| Evaluative Element | What It Indicates | Why It Matters |
|---|---|---|
| 1. Gingival Margin Harmony | Even, scalloped gum lines around each tooth. | Sign of healthy tissue and precise prosthetic fabrication. |
| 2. Occlusal Plane Orientation | The plane of the biting surfaces is parallel to the horizon. | Essential for proper function, force distribution, and facial balance. |
| 3. Incisal Edge Position | Where the front teeth end relative to the lip. | Determines smile aesthetics, speech (“F” and “V” sounds), and lip support. |
| 4. Lip Support & Posture | How the prosthesis supports the lips from behind. | Prevents a “collapsed” look, restoring a youthful facial profile. |
| 5. Phonetic Line Visibility | How much of the teeth show during relaxed speech. | Ensures the prosthesis looks natural when talking, not just smiling. |
The 3 Photo Angles Every Trustworthy Gallery MUST Show
Beware of galleries showing only front-facing smiles. Comprehensive documentation includes:
Frontal Smile at Rest & Full Smile: Assesses tooth display, midline alignment, and overall aesthetics.
Side Profile (Lips at Rest): The most critical for evaluating facial support. Shows restoration of lip fullness and nasolabial angle.
Occlusal/Chewing View: Shows the palate, arch form, and tongue space. Proves it’s not just a “facade.”
references :
International Congress of Oral Implantologists (ICOI) guidelines, which are the global standard for evaluating implant success.
Real-World Mini-Case: Advanced Bone Loss, Realistic Outcome
Patient: 68-year-old male, 15+ years with full dentures.
Before State: Severe lower jaw bone resorption, unstable denture, “witch’s chin” appearance, inability to eat firm foods.
Procedure: All-on-4® with zygomatic implants in upper jaw, nerve repositioning in lower.
12-Month Outcome: Denture stability achieved—patient eats steak and apples confidently. Facial profile shows improved but not completely reversed lower lip support. The photos document functional triumph with aesthetically realistic, age-appropriate teeth.
This case exemplifies that the goal is optimal rehabilitation for the individual’s anatomy, not a one-size-fits-all “perfect smile.”
What Changes From Before to After All on 4 Dental Implants: The Visual Breakdown
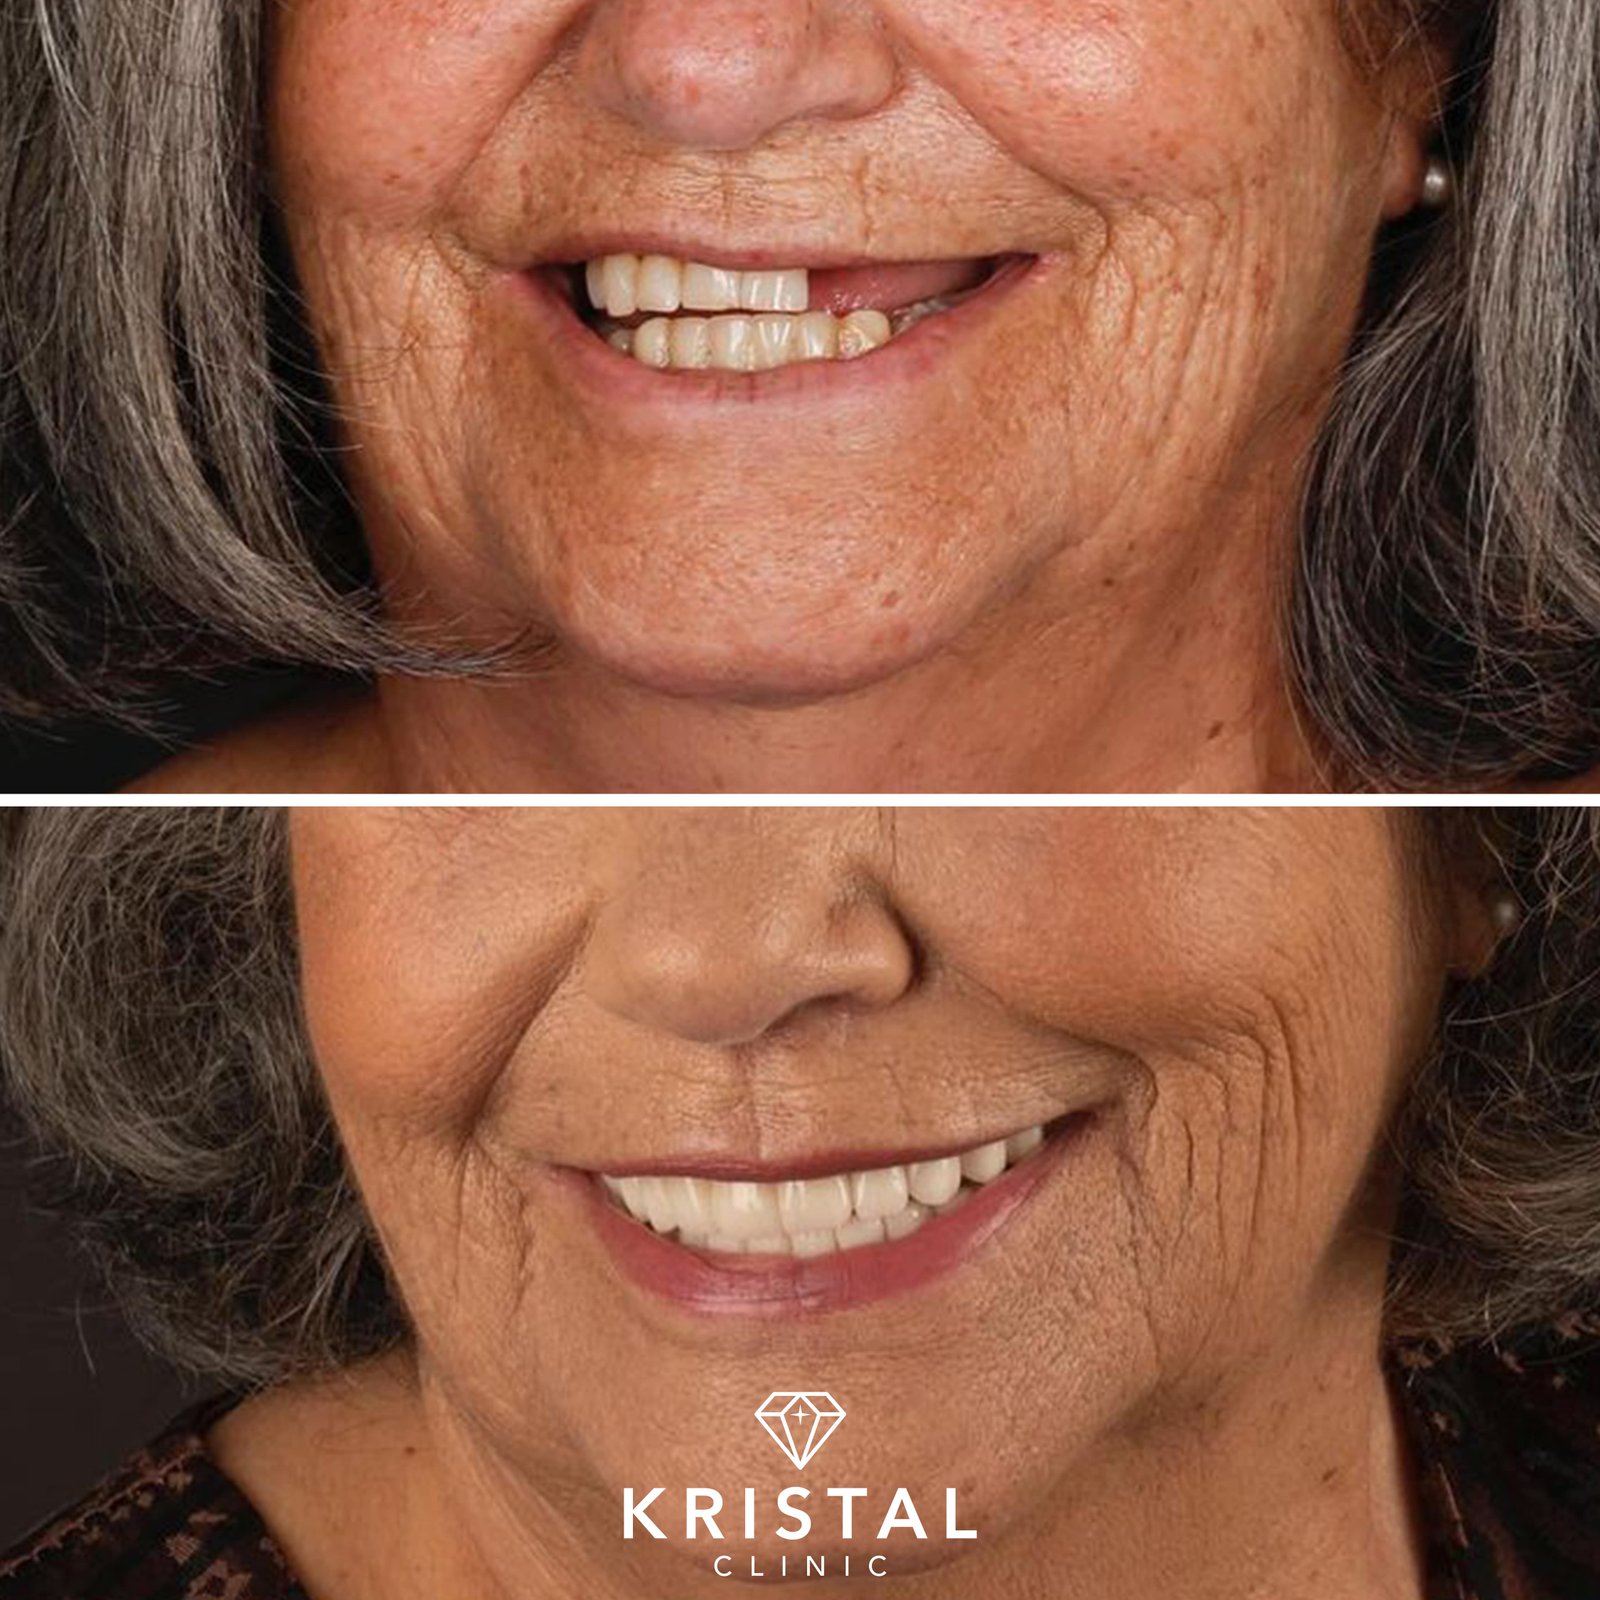
📐 1. Restored Nasolabial Angle
📉 Before: Lines from the nose to the mouth corners are deep and downturned.
✅ After: The angle is softened, reducing a perpetually sad or aged expression.
〰️ 2. Eliminated Mentolabial Fold
📉 Before: A deep, shadowed crease forms between the lower lip and chin.
✅ After: The fold is softened due to proper lower jaw and lip support.
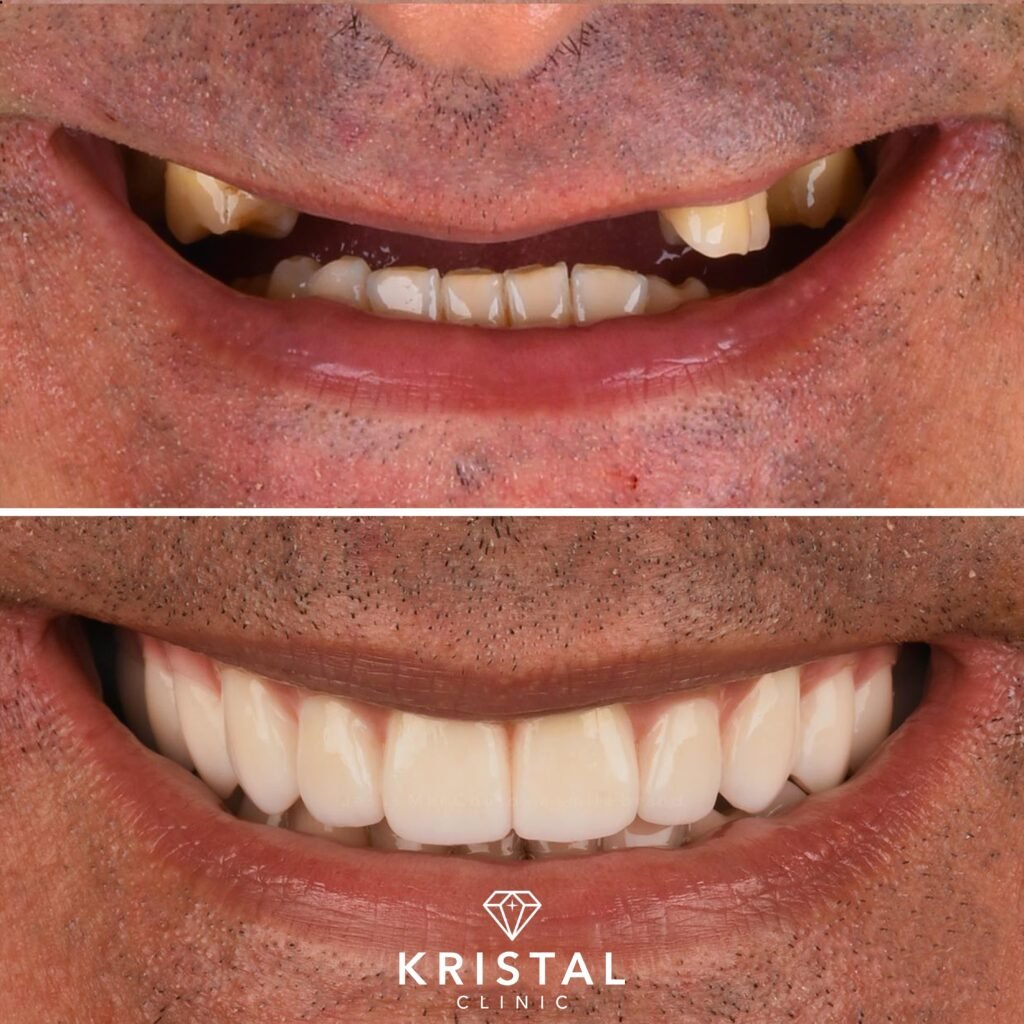
😁 3. Corrected Smile Arc
📉 Before: Teeth appear flat, worn, or reverse the natural curve of the lower lip.
✅ After: The edges of the upper teeth follow the curve of the lower lip perfectly (the “Youthful Curve”).
⚖️ 4. Stabilized Midline & Facial Symmetry
📉 Before: Dental midline may be off-center, affecting perceived facial symmetry.
✅ After: The midline is aligned precisely with the center of the face, enhancing overall balance.
🔬 Clinical Interpretation: These changes result from restored vertical dimension and proper anterior support. The prosthesis acts as a scaffold, reversing the facial collapse caused by tooth loss.
Before and After All-on-4 Dental Implants: The Outcome Timeline (Step-by-Step Evolution)
🛑 PHASE 1: BEFORE
Condition: Tooth loss/failure, bite collapse, facial aging.
🗣️ Patient Insight: “I avoided smiling and struggled to eat anything crunchy.”
⚡ PHASE 2: IMMEDIATE (Surgery Day)
👁️ Visible Change: “Smile in a Day” – Dramatic aesthetic improvement with temporary prosthesis.
⚠️ Reality: Healing is just beginning. Bite is preliminary.
🗣️ Patient Insight: “I walked out with teeth! But they feel foreign and I’m on a soft diet.”
🔄 PHASE 3: 3–6 MONTHS AFTER
👁️ Visible Change: Tissue adaptation, gums healing around prosthesis.
⚙️ Functional Milestone: Bite refinement, increased chewing confidence.
🗣️ Patient Insight: “Getting used to them. Chewing is easier, my smile looks good in photos.”
💡 Clinical Note: To understand the biological milestones that drive this visual transformation, review our detailed guide on dental implant healing stages and success rates.
✅ PHASE 4: 12+ MONTHS (FINAL)
👁️ Visible Change: Mature, balanced aesthetics. Stable gum contours.
⚙️ Functional Milestone: Full function, stable forces, predictable performance.
🗣️ Patient Insight: “They feel like my own teeth. I don’t think about them anymore.”
💰 Financial Planning for 2026
While the visual changes are immediate, the investment requires careful planning. If you are moving from research to budgeting:
See our all-on-4 dental implants cost 2026 complete price guide for a detailed breakdown, financing, and global pricing comparisons.
Review our guide to All-on-4 payment plans and financing to structure your investment.
📚 Related Resources
Ready to learn about the process?
📖 Read our detailed guide on how to get your smile back fast with All-on-4 dental implants.
⚖️ Compare different solutions in our Types of Dental Implants overview.
🤔 Curious about your specific timeline?
Every mouth heals differently. Take our 60-Second Candidacy Assessment to see if your bone structure and health profile align with the standard All-on-4 timeline.
Before and After All on 4 Dental Implants Pictures: Gallery Standards & Scrutiny
Anatomy of a Trustworthy Before/After Photo
1. Neutral Background: Consistent, non-distracting color.
2. Standardized Retraction: Lips fully retracted to show all teeth and gums.
3. Natural Color Balance: No excessive whitening or filters.
4. Full Tooth Display: Shows from last molar to last molar.
Our Image Authenticity Policy
All clinical images in our gallery adhere to strict ethical standards:
Informed Consent & Privacy: Every patient provides written consent; all images are de-identified.
No Cosmetic Retouching: We do not digitally alter gum tissue, tooth shape, or facial features. Only basic exposure/white balance corrections are applied.
Accurate Time-Stamping: “After” photos are clearly labeled with time elapsed since final prosthesis delivery (minimum 12 months).
Good Gallery vs. Bad Gallery: A Side-by-Side Comparison
Trustworthy Gallery (Good) Misleading Gallery (Red Flag) Case shown at 12+ months with final prosthesis. Only shows “Smile in a Day” immediates. Displays all 3 critical angles (front, profile, occlusal). Only a single, tightly cropped frontal smile. Notes patient specifics (e.g., “Case with moderate bone loss”). Makes universal, perfect claims for every case. Images are consistent in lighting, head position, and exposure. Inconsistent backgrounds, angles, or obvious photo editing/whitening. Links to a detailed case study or video testimonial. Standalone photos with no context or narrative.
If you’re unsure whether a clinic’s results are authentic or staged, a professional review can save you from costly mistakes.
✅ Verify My Case With a Specialist
We assess timelines, bone support, and prosthesis realism
Smile-Focused Transformations: The Aesthetic Breakdown
The Smile Analysis Grid: 4 Types of Transformations
| Primary Issue | Visible Transformation Focus | |
|---|---|---|
| CASE A | Severe Wear & Short Teeth | Tooth Length & Proportion: Restores normal tooth dimensions for a youthful smile. |
| CASE B | Gum Disease & Recession | Gingival Contours & Health: Focus on healthy, even gum tissue framing the teeth. |
| CASE C | Collapsed Bite & Facial Support | Lip Fullness & Profile: The “facelift effect” – restoring support to lips and cheeks. |
| CASE D | Asymmetry & Midline Misalignment | Balance & Harmony: Corrects dental midline and creates symmetrical tooth display. |
Understanding “Smile in a Day” Photos:
The immediate change is powerful, but the smile in the photo is a temporary prosthesis. It is designed for aesthetics and healing. The final prosthesis (fitted months later) will have refined contours, better fit, and enhanced durability.For a detailed look at the financial aspect of this immediate solution,
see our breakdown of Same-Day All-on-4 costs. The final prosthesis (fitted months later) will have refined contours, better fit, and enhanced durability.
Full Mouth Dental Implants Before and After: All on 4 Results
Full-arch (full mouth) comparisons highlight global facial rejuvenation, not just a new smile. Key things to look for:
The Nose-to-Chin Relationship: The distance appears balanced, not collapsed.
Lip Competence: Lips seal together comfortably without strain.
Cheek Support: The “hollowed” look under the cheeks is improved.
Confident Posture: Patients often appear more upright and confident in ‘after’ photos.
📚 Continue Your Research: Meaningful transformations require meaningful planning.
Worried about the process? Read our Step-by-Step Guide to the All-on-4 Procedure.
Planning your budget? View our transparent [All-on-4 Cost & Value Analysis].
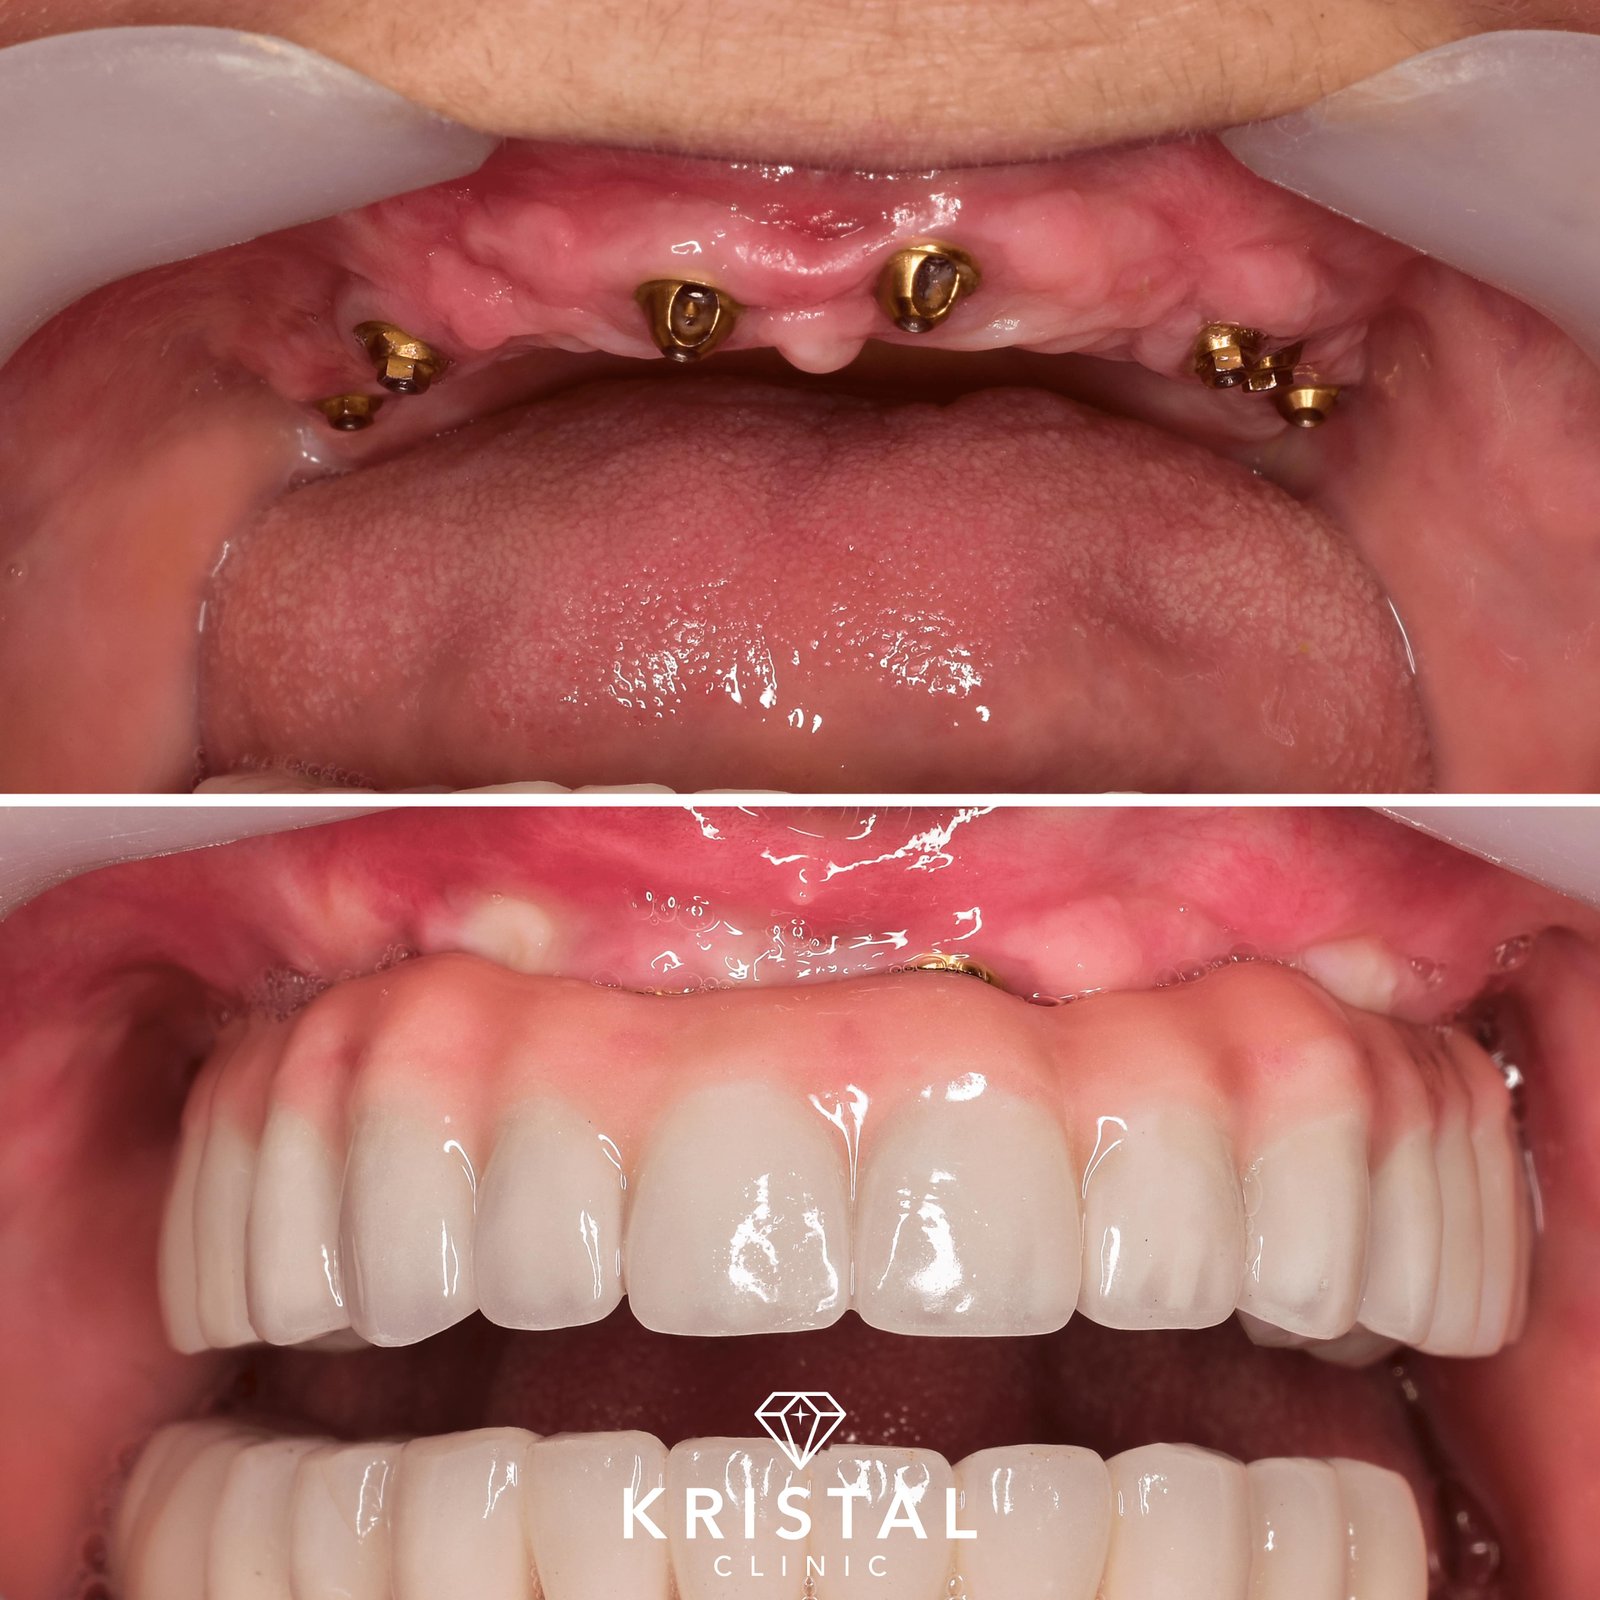
Gum Disease Before and After All on 4 Dental Implants
Critical Close-Up Focus:
Before: Gums are red, inflamed, swollen, and may bleed. Teeth may appear “long” due to recession.
After (12+ Months): Gums are pink, stippled (orange-peel texture), and tightly adapted to the prosthesis. Inflammation is resolved.
🔬 Clinical Note: All-on-4® removes hopeless teeth and diseased tissue. The prosthesis is designed for easy cleaning around the implants, promoting long-term gum health. The ‘after’ shows stability, not just aesthetics.
When Before and After All on 4 Results Are Less Predictable: Realistic Expectations
| Risk Factor | Effect on Visible Before/After Results | Realistic Outcome Modifier |
|---|---|---|
| Severe Bone Loss | Reduced ability to fully restore lost facial volume in the lower third. | “Excellent functional rehabilitation. Facial support is greatly improved, though some pre-existing volume loss may remain.” |
| Heavy Smoking | Inconsistent soft-tissue healing, potential for longer inflammation. | Results focus on functional gain. Gum tissue may appear less than ideal. |
| Unmanaged Bruxism (Clenching) | Risk of accelerated wear on prosthetic teeth over time. | Outcome includes use of a protective night guard. Aesthetic results are excellent but require maintenance. |
| Poor Hygiene Compliance | Risk of peri-implant mucositis (gum inflammation around implants). | ‘After’ results are contingent on patient commitment to daily cleaning protocols. |
Turkey Before and After All on 4 Dental Implants: Evaluating International Outcomes
Geography doesn’t determine quality—clinical protocols and follow-up do. However, finding a destination that adheres to strict medical regulations is vital. We recommend reviewing our ranking of the best countries for All-on-4 implants to ensure you are targeting locations known for high clinical standards.
Who fabricated the final prosthesis? Was it done in-house with quality control or outsourced?
What implant system is used? Is it a major, globally available brand with a long-term track record?
Where are follow-up and adjustments handled? Who manages complications at 6 months or 3 years?
Is the photography standardized? Do they show the same rigorous documentation as top US/UK clinics?
Key Point: The most beautiful immediate photo is meaningless without a plan for long-term maintenance and prosthetic repair (which all implant bridges will eventually need).
🛡️ Protect Your Smile: Whether you choose treatment at home or abroad, you need to ask the right questions. Get our “20 Essential Questions to Ask Your Implant Surgeon” guide—covering warranties, materials, and revision protocols. [📄 Get the Questions Guide]
How Patients Experience the Transformation (Beyond the Photo)
The emotional and functional journey mirrors the visual timeline:
Weeks 1-2: Adaptation phase. Learning to speak and eat with new teeth.
Months 1-3: Growing confidence. Enjoying a broader diet.
Months 6-12: “Forgotten” phase. The prosthesis feels integrated and natural.
Year 1+: Lifestyle normalization. Smiling, laughing, and eating without a second thought.
Your Checklist: How to Interpret Any Before & After Gallery Like a Pro
Use this worksheet when reviewing any clinic’s results:
✅ TIMESTAMP: Is the “after” photo labeled with a time point (e.g., “1 year post-op”)?
✅ ANGLES: Does the case show at least a frontal and a profile view?
✅ CONTEXT: Is there information about the patient’s starting condition (bone loss, etc.)?
✅ CONSISTENCY: Are the ‘before’ and ‘after’ photos taken under similar conditions (lighting, head position)?
✅ REALISM: Do the results look natural and proportionate, or overly perfect and “stock photo”-like?
✅ STORY: Is there a patient video or quote that explains the functional and life changes, not just the look?
Red Flags in Misleading Galleries:
🚩 No timestamps on “after” photos.
🚩 Only “Smile in a Day” immediates.
🚩 Excessive digital whitening or smoothing of gums.
🚩 Every single case looks impossibly perfect and identical.
🚩 No access to detailed case studies or patient narratives.
To look beyond the polished photos and understand what these red flags might be hiding, read our guide to the honest truth about All-on-4 risks and problems.
Summary: What Authentic Before & After Galleries Prove
Authentic before and after all on 4 dental implants galleries demonstrate a successful biomechanical rehabilitation. They provide visual proof of:
Restored Function: The ability to eat, speak, and live without dental limitations.
Recovered Structure: The reversal of facial collapse and support of soft tissues.
Achieved Stability: A long-term, predictable solution anchored in bone.
Renewed Confidence: The patient’s transformation in posture and expression.
Ready for a professional opinion on your anatomy?
No pricing • No obligation • Based on your bone, bite & health profile
What I Wish I Knew Before Dental Implants
Before starting the journey, many patients wish they had seen before and after all on 4 dental implants examples in real clinical cases, not just marketing photos. Understanding the difference between temporary and final teeth, healing timelines, and maintenance requirements makes expectations more realistic. The biggest surprise is often how much planning matters more than the surgery itself. Choosing the right surgeon and materials has a greater impact on long-term results than price alone.
Is It True That Medicare Now Pays for Dental Implants?
In most cases, Medicare does not cover dental implants, including procedures like all on four dental implants before and after rehabilitation. Coverage may apply only in rare, medically necessary situations linked to trauma or hospital-based surgery. Patients often confuse supplemental plans or private insurance with Medicare itself. Always verify coverage in writing before planning treatment.
Can You Tell If Someone Has All-on-Four Implants?
When done correctly, it’s very difficult to tell if someone has implants by appearance alone, especially after Before and After All-on-4 Dental Implants Step by Step treatment is completed. Modern smile design focuses on natural proportions, gum contours, and facial harmony. Poorly designed cases look artificial, but high-quality All-on-4 results blend seamlessly with the patient’s features. Functionally, they feel stable and natural during daily use.
How Long After All-on-4 Implants Can You Eat?
Most patients can eat soft foods within 24–72 hours, but normal chewing is introduced gradually. During the healing phase, following dietary instructions is critical for protecting results seen in gum disease before and after all on 4 dental implants cases. Hard or sticky foods are avoided for several months until full bone integration occurs. Final restorations allow a return to confident, unrestricted eating.

